 11:29 PM
 Unknown
Step 1
Open a regular photo in Photoshop. I used a photo of a cat that I found on sxc.hu http://www.sxc.hu/photo/1069561

Step 2
Duplicate the layer and go to Filter>Other>High Pass. Use 5 pixels. Then change the Blend Mode of the layer to Hard Light.

Step 3
Duplicate the High Pass layer. Keep the blend mode with Hard LIght.

Step 4
Duplicate the original photo and change its Blend Mode to Screen. Then with the Eraser Tool (E) or with a Mask. Delete the dark areas of the photo. Leave just the light areas, the eyes, nose, and mouth. Below you can see the areas I kept, the marquee selection.

Step 5
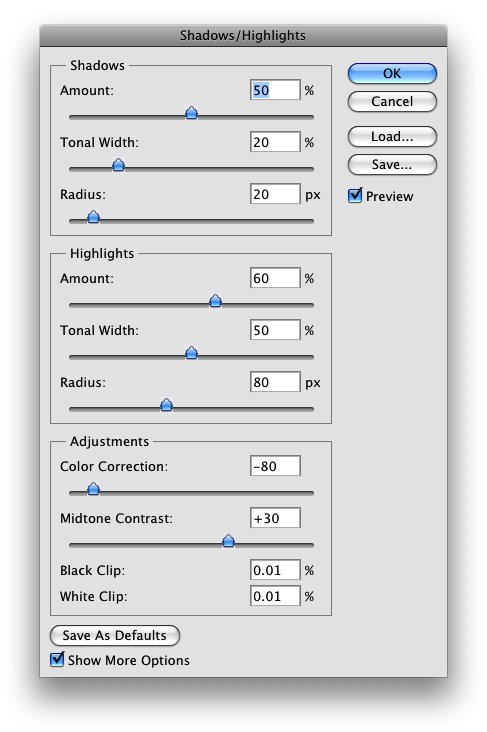
Group all layers and convert them to Smart Objects, Layers>Smart Objects>Convert to Smart Objects. Or if you prefer just merge the layers. Then go to Image >Adjustments>Shadow and Highlights. Use the values from the image below. With this adjustment you can edit how the shadows and highlights will be displayed, and you can simulate the HDR effect by increasing the Tonal Width and Radius on the Shadow and Highlights, and, also the Midtone Contrast.
Conclusion
This is just one way to enhance your photos, you can use the Unsharp Mask filter as well. But I prefer the high pass with hard light, I think it gives a better result, however that will depend the photo you are working on. The most important thing is test and play with the settings and of course add more techniques to your repertoire. If you have a different quick tip, leave a comment sharing and explaining it to us ;).

Step 1
Open a regular photo in Photoshop. I used a photo of a cat that I found on sxc.hu http://www.sxc.hu/photo/1069561
Step 2
Duplicate the layer and go to Filter>Other>High Pass. Use 5 pixels. Then change the Blend Mode of the layer to Hard Light.
Step 3
Duplicate the High Pass layer. Keep the blend mode with Hard LIght.
Step 4
Duplicate the original photo and change its Blend Mode to Screen. Then with the Eraser Tool (E) or with a Mask. Delete the dark areas of the photo. Leave just the light areas, the eyes, nose, and mouth. Below you can see the areas I kept, the marquee selection.
Step 5
Group all layers and convert them to Smart Objects, Layers>Smart Objects>Convert to Smart Objects. Or if you prefer just merge the layers. Then go to Image >Adjustments>Shadow and Highlights. Use the values from the image below. With this adjustment you can edit how the shadows and highlights will be displayed, and you can simulate the HDR effect by increasing the Tonal Width and Radius on the Shadow and Highlights, and, also the Midtone Contrast.
Conclusion
This is just one way to enhance your photos, you can use the Unsharp Mask filter as well. But I prefer the high pass with hard light, I think it gives a better result, however that will depend the photo you are working on. The most important thing is test and play with the settings and of course add more techniques to your repertoire. If you have a different quick tip, leave a comment sharing and explaining it to us ;).
 Posted in
No Response to "Photoshop Quick Tips #3 - Enhancing Photos with High Pass Filter"
Post a Comment