Magic Extractor - Change Background in Photoshop

This tutorial is an advanced guide covering how to use the Magic Extractor to change background in Photoshop. The Magic Extractor is an incredible useful tool, and something that can be used for many art projects.


To open up the Magic Extractor, go to Image> Magic Extractor. 


First of all, let me explain the uses of the various tools in the Magic Extractor. I've composed a list and made a diagram to make it as clear for you as possible. Click on any the images in this post to see a larger version.


Diagram of main tools in Photoshop's Magic Extractor
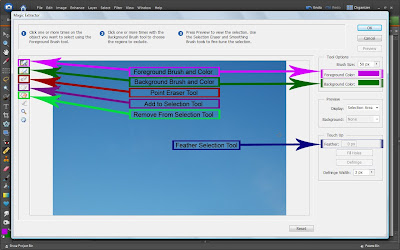
Remove Image Backgrounds Photoshop
Magic Extractor Tools Quick Reference List

6 Free New Year wallpapers

The New Years celebrations have just finished, and what better way to honour the New Year by offering six free wallpapers. To download the wallpapers, simply right click and select ‘Save As’. All the wallpapers below are free to download.


Quick tip 17 – Resize an image

This is part 17 of the Photoshop quick tip series where you will learn how to resize an image. Resizing an image is useful for reducing the size of an image file. Note that increasing or decreasing the size of an image too much can cause the image to become distorted and blurry.

Firstly, open an image in Photoshop. Then in the menu bar choose Image > Image Size and the following window dialog will appear.


Now, changing the image size is as simple as adjusting the width and height of the pixel dimensions. By default the ‘Constrain Proportions’ option is checked which means that if either one the width or height settings are changed. The other option will be changed to match the aspect ratio of the overall image file. However, if you want custom dimensions you can uncheck this option.